Monday, October 28, 2019

Sunflowers and Fall!

Don't you just love it at the end of summer when the fields of Sunflowers are so beautiful?  I know I sure do!  Today I am going to share a card I made using Close to my Hearts Sunflower Sympathy Stamp and thin cut set!  I love this set so much I will be turning this card into a Thanksgiving card!

I am also sharing this card with Heart 2 Heart Challenges blog!  Check out all of the beautiful artwork on their blog.

I used the Hawthorn paper pack (the Sangria plaid), our new stitched circles embossing folder with Saffron cardstock.  I used Saffron and Gold Rush to stamp the Sunflower on White Daisy.  I used Sangria for the middle piece and then topped that off with Gold stickles around the center.  The leaves are stamped in Evergreen!  Such a pretty green. I stamped the Thinking of you in Sangria and put some Gold embellishing thread on the back side and formed loops!  The yellow ribbon is from my stash!

I really like the way this card turned out and I hope you do too!  Most of these products will be retiring at the end of the month, except the inks and Saffron cardstock so if you like them, you better get them.

Here is a complete list of link where you can buy these products and I hope you visit my website soon.  Don't miss out!


I hope you enjoy the rest of your fall!

Ronda


Friday, October 25, 2019

Pumpkin Spice

Who doesn't like a little Pumpkin Spice in their life?  I have been having so much fun making fall cards that I would like to share one of them with you!  This one is going to be entered in this weeks Heart 2 Heart Challenge!  I have had so much fun working with this stamp and thin cut set!  There is only 6 more days to get it and it will be gone so check it out on my Close to my Heart page!  Here is the link:  https://paperdivas.closetomyheart.com/Retail/Product.aspx?ItemID=12522&ci=14856.

I have used the Hawthorn paper collection to make this card!  This Sangria plaid is my favorite piece in the pack!

To color the pumpkins I used an Orange water color pencil along each line and then I dipped our clear shimmer brush into the ink on the top of the ink pad.  I then just blended the colors without mixing them to much.  I love the look I got.  I didn't want a bright orange pumpkin.  I wanted it to match the paper a little bit.  It also has a really nice shimmer.

I also used our new Sangria ribbon and some sequins to embellish.  I stamped the Autumn Blessings in Sangria (my new favorite color)!  https://paperdivas.closetomyheart.com/Retail/Product.aspx?ItemID=11653&ci=15083


Here is the link to the Hawthorn paper pack, which will also be retiring at the end of the month!
https://paperdivas.closetomyheart.com/Retail/Product.aspx?ItemID=12489&ci=14814.


Well I hope enjoyed my post and my card and will come back and visit soon!
Happy, Happy Fall!

Ronda


Saturday, October 19, 2019

Craft With Heart!

The weekend is here and while I am going outside today to clean up some gardens, yes the sun is shinning and it is going to be about 60 so I better get some done.  We have had a frost the last 2 nights so I think it is about time.  I need to plant my Garlic too!  I thought I would make post about how much fun and how much I love this card kit Subscription, Craft With Heart.

So far I have only one friend that has joined me in this Subscription service but I am hoping to get at least 2 more.  I had a craft day on Thursday and my 2 dear Friends, Marty and Judie came over to play.  First we made an ornament out of the Christmas special we have right now, Holiday Cheer.  It makes the cutest shaker tags and ornaments.  I will talk about that on my next post but if you want to check it out you can click right here https://paperdivas.closetomyheart.com/ctmh/promotions/campaigns/1910-holiday-cheer.aspx.  You will see them in the pictures I post today but I will give a close up in the next post.  The possibilities are endless making these and they are so much fun!

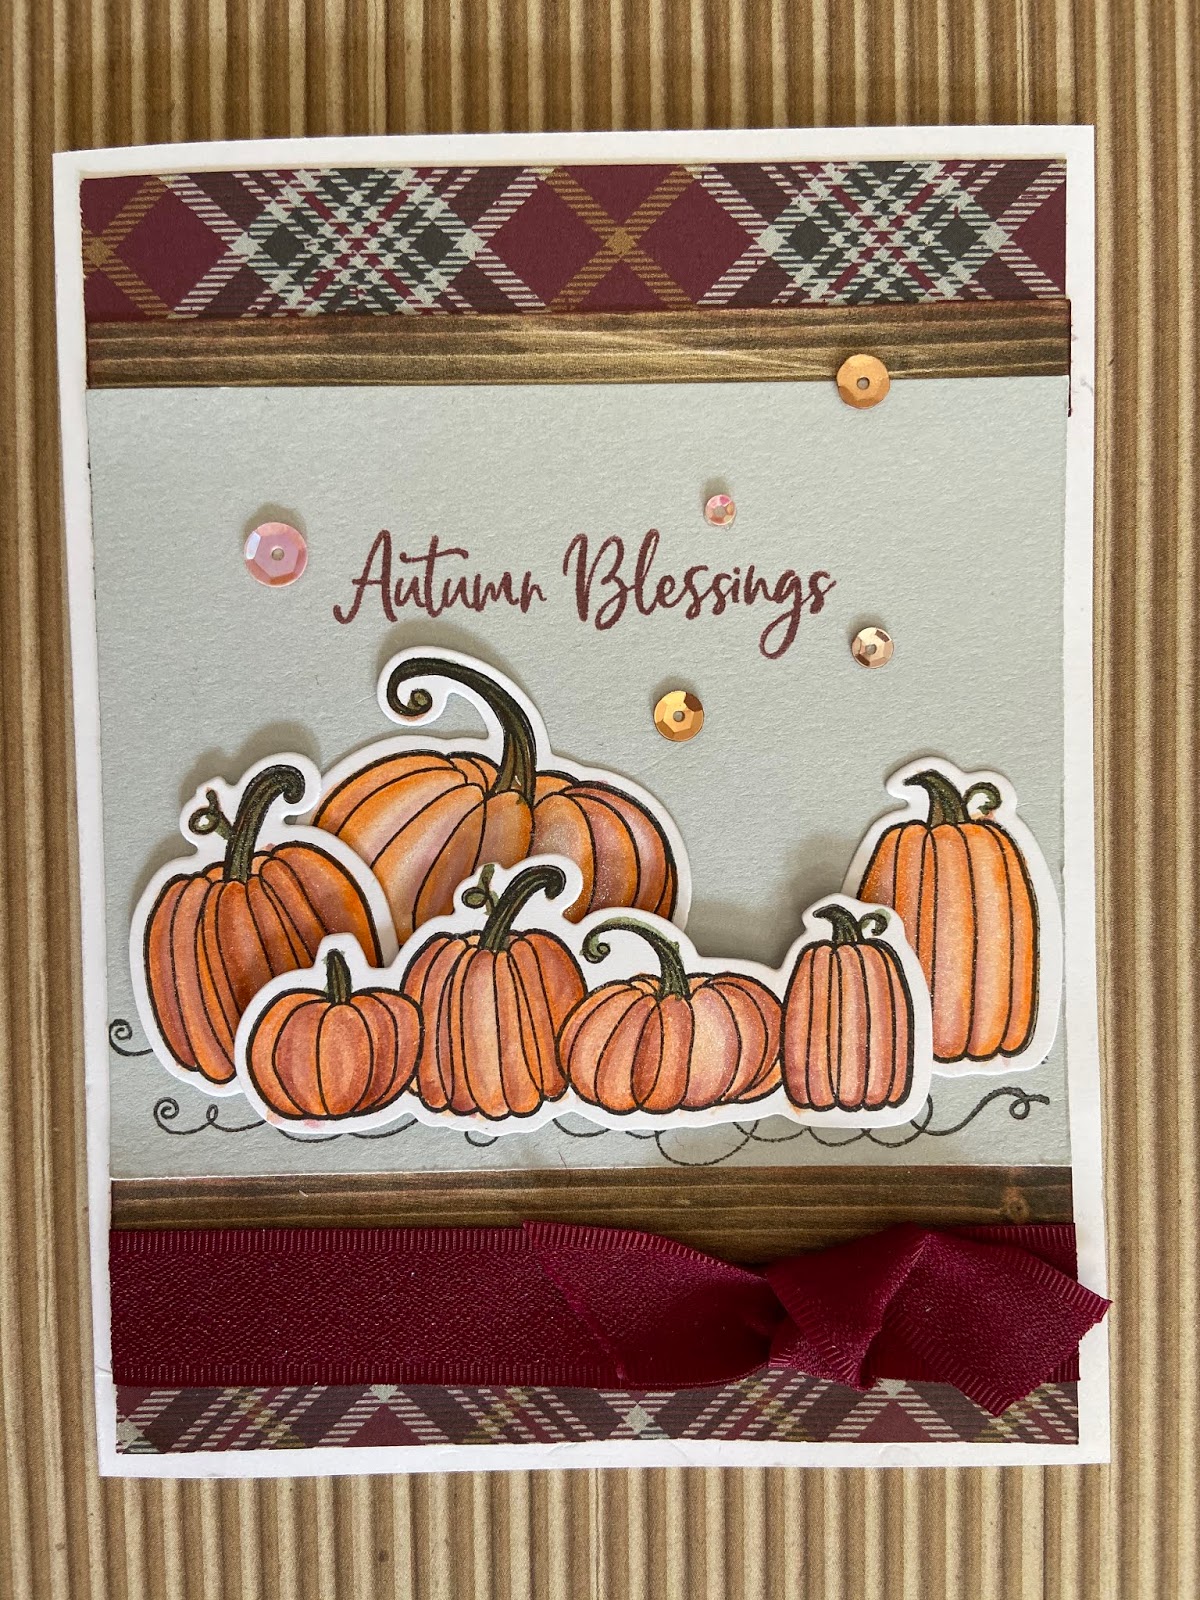
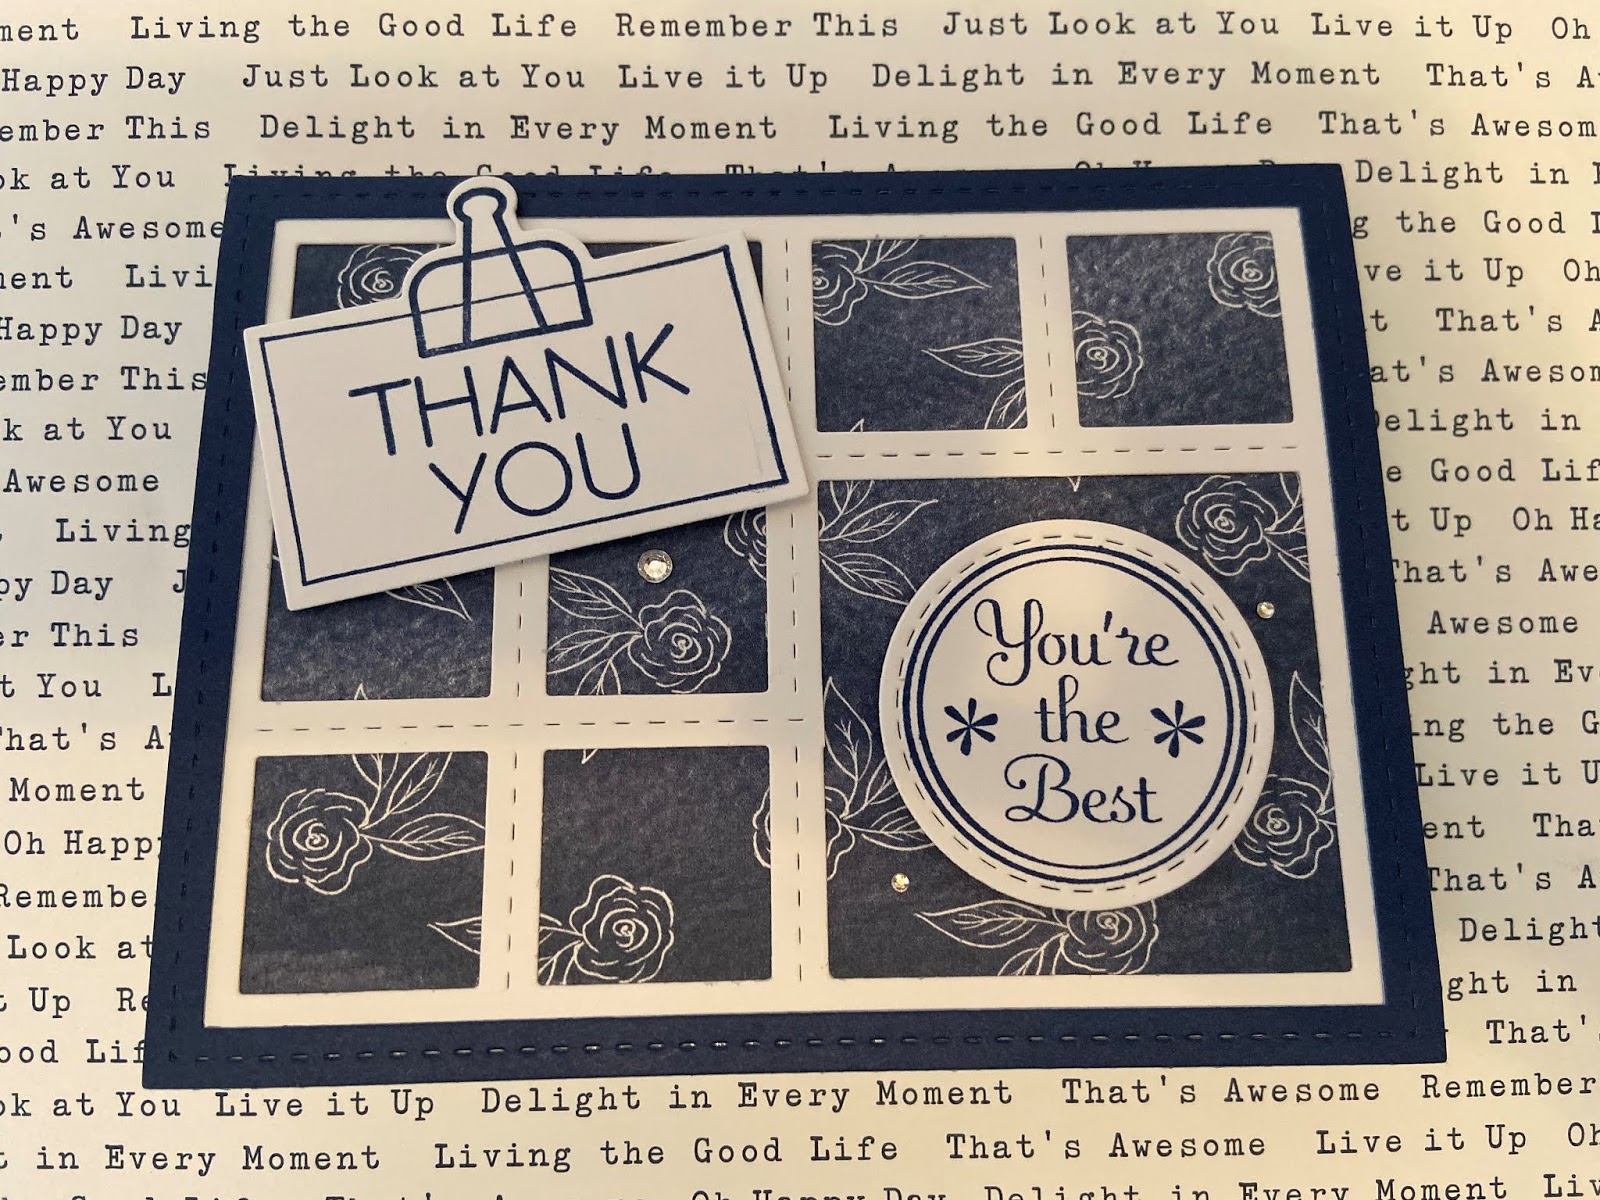
Our Craft with Heart is a subscription service and you have 2 to choose from.  Scrapbook pages or cards.  Today I want to talk about the New card subscription.  Marty is my partner in crime here and we made these three cards our own by changing the layout of things and adding a little extra bling.  Beside those little things the cards are just as directed and they are really cute.  I can't wait until our next playdate so we can make some more of them.

Now, a little information on the service before I show you some pictures!  You get a box every 3 months and it only cost $1.38 per card if you pay for the whole year.  Each box contains 24 cards, 2 each of 12 cards.  Click right here to get all of the pricing!  https://paperdivas.closetomyheart.com/ctmh/products/craft-with-heart.aspx.

Now for some fun pictures of our finished projects and the contents inside the box!

 Here is Marty and I feeling good about what we have made!
 Here is the contents of the box.  You get a unique stamp set, a pack of shaker adhesive and acetate, ribbon, sequins, a ink spot and a acrylic block.  Then you get pre scored card bases, die cuts numbered for each card with envelopes.  That is a lot of stuff for $1.38 a card.
 Here is a close up of the stamp set.  You can only get it with the subscription!
 On this Merry and Bright card , the only thing we added was some stickles in the middle of the poinsettia and 2 Gold Glitter Gems!
 On this Happy Birthday card we changed the sentiment from Forever Grateful for you and made the sentiment green instead of black and then we added the sequins.

On this Merry Christmas card we changed the placement of the tree and the banner and added clear sparkles which I have colored red with our alcohol markers and then add bitty sparkles also colored red to the tree.  You can look at the sparkles here:  https://paperdivas.closetomyheart.com/Retail/Product.aspx?ItemID=9384&ci=6770.

So what do you think?  Cute huh?  Now wouldn't you love to join our Craft with Heart crafting club?  We will have a special day just for this and put the whole kit together, once a quarter and we can do it at rotating houses.

I sure hope you will join us and lets see what we can do with this amazing service!

Until next time and happy Crafting!

Ronda


Tuesday, October 15, 2019

Hawthorn

Have you seen Close to my Hearts Hawthorn papers and products!  There are some absolutely beautiful products in this line!  It is a little bit masculine and a little bit fall!  Check it out here:  https://paperdivas.closetomyheart.com/retail/search.aspx?searchvalue=oct19.

I have loved working with this paper pack and some of our other new products!  Take a look!

Featured here along with the Hawthorn paper are a couple of the new stamp and die sets!  Sunflower Sympathy https://paperdivas.closetomyheart.com/Retail/Product.aspx?ItemID=12834&ci=14860and Autumn blessings!

 This was made with the October Special Share the Seasons, but you can still get it here https://paperdivas.closetomyheart.com/Retail/Product.aspx?ItemID=12787&ci=14378

 This layout I made with the Hawthorn paper and the October Stamp of the Month!  Which you can get for only $5 with a $50 order!
 This last card was made with the Share the Seasons kit and our new embossing folder Stitched Circles https://paperdivas.closetomyheart.com/Retail/Product.aspx?ItemID=12524&ci=15502.

I hope you enjoyed my little post about Hawthorn and hope you will visit my site soon!

Happy crafting,

Ronda

Monday, October 14, 2019

Every Little Thing!

If you love Purple and butterflies then this paper sweet is for you!  It is so beautiful with the Purple, Black and Julep (color of the year)!  I have had so much fun playing with these products and I'm sure that you would too!  Take a look here:  https://paperdivas.closetomyheart.com/retail/search.aspx?searchvalue=Every+Little+Thing.

I would like to share some of the cards I have made with it!  These are Thank you cards that I sent to my customers this month!  I used the PML cards from the set.

This one is a shaker card I made!  I stamped on top of the acetate using Stazon ink.


This one is from the special we had in September called Share the Seasons.  It came with 2 thin cuts and 2 stamp sets.  You can still get them while supplies last with or without the stamp sets here:  https://paperdivas.closetomyheart.com/Retail/Product.aspx?ItemID=12787&ci=14378
It is so much fun to play with!
 On this one I stamped the butterflies in Wisteria on the lighter side of the wisteria paper!


I just love this one using some Sapphire in the paper pack and an old stamp set!  Also using the Thin cut from Share the Seasons which can also be purchased by itself through the year!  Here is the link:  https://paperdivas.closetomyheart.com/Retail/Product.aspx?ItemID=12773&ci=14883.  There is also one with circles.


And then one more using the same thin cut.  You cut away where ever you want to make bigger stamping or embellishing areas!

I really love this one!

That is it for today!  I hope you all have a great week and stay warm!  Happy crafting!

Ronda


Monday, October 7, 2019

Butter pie crust!

When I first retired, one of the things I wanted to do was to learn how to make pies!  My husband loves pie, especially Cherry!

So I searched through recipes and found one for butter pie crust.  Butter has to make it better, right?  The first one I made, My husband told me it was the best pie he had ever eaten.  So naturally I made a few more using these pie crust recipe.  I really hated doing it, it is sticky and the bottom crust seemed to be gooey!  It sticks to the counter and it never looks very pretty in the pie plate because it is so hard to work with.   Messy but it really did taste so good.

I always make my own filling too.  No high fructose syrup in this house.

So finally if you have to make pie, because your husband loves it you take your brothers advise and just buy the ones rolled up in the dairy isle.  So that is what I have been doing for the last few years.

I always get the response, thanks for the pie honey but it's not like your butter crust.  Ugggg!

So he has been working hard remodeling our office so I decided to make him a cherry pie with real butter crust.  The recipe only makes one crust so I had to double the recipe.

Not being a crust expert and not having done it in quite a few years I just doubled it.  Well I think I put in to much apple cider vinegar or ice water because it was so sticky.  I divided the crust in two and put it in the fridge for an hour like the instructions said. I knew I needed more flour so I put a lot on the counter, more on top of the crust and on my roller.

Oh wow this is pretty nice! I wanted to make the bottom crust thin so it would crisp up more NOT!  It completely stuck to the counter but I finally got the first one done and put it in the fridge in the pie pan.  Then the same thing happened to the second crust but I managed to get it in another pie pan and it was a mess.

Oh well, lets get this pie finished.  So I put the filling in the first crust and then tried to flip the other one upside down onto the top and of Corse you know it was just awful.  Ugliest looking pie but I trimmed it up and decide to just use a fork to try and get the two to stick together.  I dipped the fork in sugar and went around the crust adding sugar each time.

Well so the story ends that this is an ugly pie but Oh my gosh, the crust taste so good.  LOL!!!

There is enough crust left over so I prepped that into a disc and put it in the freezer.  The next pie will have one store bought and one butter crust.

I may try this again just to see if I can perfect it.  Here is the result.

I hope you all have a great week and happy pie making!

Hugs, Ronda

Thursday, October 3, 2019

PML cards take 2

Today I want to show you a group of cards I made using the PML cards from the Every Little Thing products that we have on sale now through October 31.  To see the entire pack of these cards just scroll a couple of posts back!


I just love how they turned out and it was so quick to do them.  I just used white card bases, trimmed down the PML card to 4 x 5.25 to leave just a little white edge showing.  I used our stitched circle thin cuts to cut out a circle of the Every Day Life paper and then used a smaller size in Wisteria to layer on top with my sentiment on it.  I used a little wisteria ribbon, a bit of Julep velvet ribbon and our Julep Sequins to embellish!  Julep is out color of the year!


To find all of the products used here just visit my website at paperdivas.ctmh.com.

I sure hope you enjoy your day and please follow my blog and visit my website soon!

For the love of paper.  Ronda

Tuesday, October 1, 2019

October Stamp of the Month Blog Hop


Welcome to the October Stamp of the Month Blog Hop, Autumn Air!  This hop will circle around several Consultants blogs so just sit back, relax and enjoy the beautiful artwork.  Here is a complete list of all of the blogs incase you get lost along the way.  Just click here for the complete list !

You should have arrived from Jessica Kaiser blog, if so then your in the right place!

I decided this was the perfect stamp set for a layout and I enjoyed making it so much.  I used the Hawthorn paper collection along with the light side of Toffee for the base pages.  I hope you like it!


I used sapphire, sage and paprika for the stamping.  Do you see the sapphire stamping just above the saffron pieces on the bottom of both sides?  I really like that little stamp.  It just added a little color.  I layered the leaves around the stamping of summer and fall to give them some dimension.

I really love using different sizes of photo's on my layouts and I use Persnickety prints to print all of my photos.  They have so many options and the photo's are wonderful quality.

I can use the 3 x 4 spot for a photo or put a PML card there and do some journaling.  I still have room for more embellishing too with maybe some wooden leaves.  I used some sequins around my leaves from the craft on collection of shaker sequins.  Here is a nice picture of the stamp set.


I just love it!  I will put the links below for all of the products that I have used but for now you will be moving on to Janet Royer's blog.  I hope you enjoy the rest of your journey on this blog hop!

Hawthorn paper pack, X7249B: https://paperdivas.closetomyheart.com/Retail/Product.aspx?ItemID=12489&ci=14814
Craft loose sequins, Z4059: https://paperdivas.closetomyheart.com/Retail/Product.aspx?ItemID=12131&ci=15804
Toffee paper, X5950: https://paperdivas.closetomyheart.com/Retail/Product.aspx?ItemID=10240&ci=8948 or you can make your own pack of 12 or 24 sheets of any colors using this Custom24 or custom12 as your item number.  You can also get the coordination cardstock for the Hawthorn paper, X7249D: https://paperdivas.closetomyheart.com/Retail/Product.aspx?ItemID=12490&ci=14816
Sapphire ink pad, Z2848: https://paperdivas.closetomyheart.com/Retail/Product.aspx?ItemID=9322&ci=6670
Sage ink pad, Z6504: https://paperdivas.closetomyheart.com/Retail/Product.aspx?ItemID=11312&ci=11881
Paprika ink pad, Z6515: https://paperdivas.closetomyheart.com/Retail/Product.aspx?ItemID=11652&ci=15081

Well I think that it is and you can visit my website at paperdivas.ctmh.com.  Thanks so much for looking at my Blog!  Have a great day!

Ronda